Thursday, 3 May 2012

summer serenade part 5

I had to show samples of the quilting before I started doing any on the actual quilt, so this is my 'play' piece.  I was thinking about doing some of the quilting in gold thread.  I used Raiman rayon thread which quilts up very well on my Husqvarna, with a bottomline pre-filled bobbin.  The cream quilting in the background uses the same bobbin with Signature thread in the top.  The micro stippling was SO time consuming that I didn't do any that would be behind the purple quiltlet.


I placed it against the sample of the coloured fabrics.  I thought that it didn't really need the gold thread as I wanted the quilting to be more of a background than a feature, so I decided to do the quilting on the actual quilt with cream thread instead of the gold.


I tried out some ideas for the cream background next - micro stippling and mctavishing (the swirly design).  I LOVE the look of the mctavishing but it was very hard to see the cream thread on the cream fabric.  I finished it on this little piece though.


There were some leftover coloured strips of fabric left over from where the main quilt so I stitched a couple of borders around the 'play' piece and made it into this little quilt.  I really like the way it turned out in spite of the fact that I had to add the borders quilt-as-you-go style, because the backing fabric was cut the same size as the cream bit on the front.  It was a bit of a pain to do but turned out okay if you don't look at the back very closely!


Wednesday, 2 May 2012

summer serenade part 4

Looks like I missed a few photos here.  I cut strips from each of the fabrics, using five (I think) different measurements.  The light purple was the widest as this would be on the outside edge of the quilt as would be trimmed back later.  The cream was also fairly wide as this would also be trimmd back.  The mid purple that is next to the cream was narrow so that it just framed the cream.  The gold, orange and red were all the same width and the two darker purples combined were about the same as the red.

I pieced them together then crosscut them into the striped units you can see below.  To make the wave I moved each unit up or down a quarter of an inch.  I made two mirror image bargello pieces.  I trimmed the cream edge so that it was straight and joined another plain cream piece inbetween the two bargello bits.  It measured roughly 60" x 32" at this stage.


summer serenade part 3

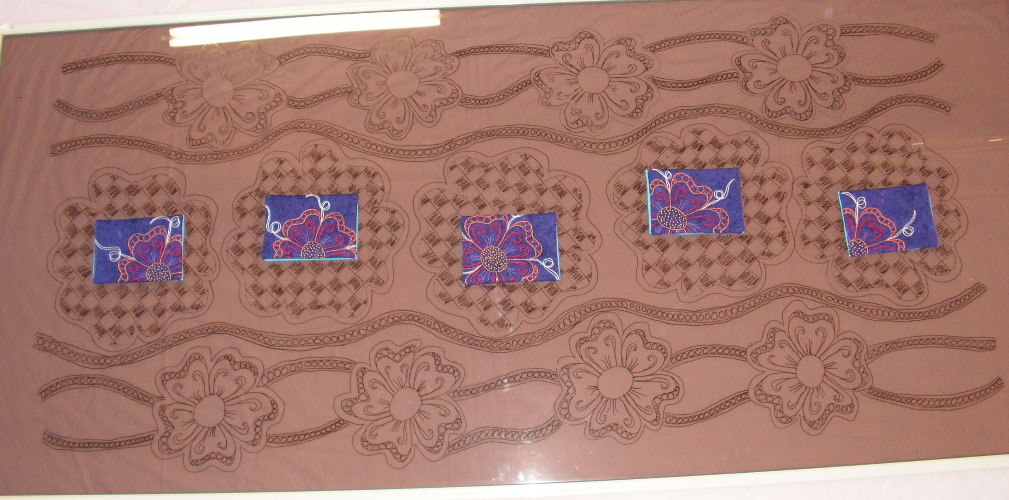
In my initial quilt sketch there were seven little quiltlets but when it came time to actually start making the quilt, it seemed to only want five otherwise it looked way too crowded.

I wanted the quilting and the embroidery on the quiltlets to basically follow the same flower design so that the quiltlets would be integrated into the background.  I sketched the full flower for the quilting and variations of a partial flower for the embroidery.


I spent some time one day putting down a few ideas for the quilting.  I like the look of this design but changed it a bit from this sketch.  I found it quite valuable to just sit down with pencil and paper and rough out a few ideas - basically just doodling.


This was the trial of the embroidery on the quiltlets.  I grabbed this piece of dark purple fabric out of the scrap box but the fabric I actually used was not as dark as this one.  I was quite happy with the design so went ahead and made all of them plus an extra one just in case.


Here they are - don't they look good?


Mulling over some more quilting ideas, I drew up some of them on greaseproof paper.  I liked the look of this one so decided to go with it.


Expanding on the quilting design a bit.  When we had our bathroom renovated, I kept the glass out of the shower cubicle to use in my studio.  Not only is it great to put on top of my trestle table to paint fabric on, but it is BRILLIANT to lay on top of quilt tops and draw quilting designs with white board markers which just wipe off when I've finished with them!

summer serenade part 2

The next step was choosing the fabrics I wanted to use.  I knew that I wanted to use purple, red and gold (more about those colour choices in a later post).  Most of these fabrics came out of the stash.  I just played around with the arrangement until I found one that looked right to me.


Ahh, this is the one - a light centre section with a darker 'frame' and then the other colours sort of graduating out to the edge. Luckily I liked the lighter purple paisley design on the edge as that's the fabric I had the biggest piece of.


I cut a few strips of similar fabrics to stitch together so that I could do a sample of the quilting.  So glad I did!  I found that no matter what colour thread I used, none of the quilting showed up against the orange-y fabric.  The design of the fabric was way too busy and the quilting just faded into the background.   So I changed that fabric for a tone-on-tone with a similar value.  It worked much better.


summer serenade part 1

Summer Serenade is the name of the quilt I've recently finished.  It was the final assessment piece for the City & Guilds Level 2 Patchwork & Quilting Certificate course I've been doing through Design Matters (Linda and Laura Kemshall).  Edwina Mackinnon is the wonderful tutor I had for the course.

Each step in the making of this quilt had to be explained and sampled.  These photos show my initial ideas.  I changed them a little during the making of the quilt but really didn't deviate that much.  I tried to take some photos to show the process but forgot quite a few I think!


Monday, 26 December 2011

what I've been working on recently - a cushion!

I don't make cushions as a general rule- they're small...and fiddly...and, well, not very satisfying.  I make quilts, and they're mostly biggish ones.  But for my city and guilds assessment, I made this cushion.  The photos don't show up in the order I thought they would (I never can seem to get that right) but I'm sure you can follow them.  I used plain white homespun and some of my hand dyed fabrics.


I had to show where I had tried out various different things for the quilting and applique, which slows down the process considerably.  Usually I decide on something then just go ahead and do it.  If it doesn't work, I say 'oops' and then unpick it or, more likely, tell myself that's what I wanted to do in the first place!  I did find it useful for this project though, as I changed my mind about a couple of things after doing the samples.   


On the whole, I'm pleased with my cushion. I hope you like it too.

Cheers, Cat

Wednesday, 14 December 2011

Ricky Tims is coming to town!

Well, to Adelaide anyway.  Tracey and Sharon, the two wonderful women who founded the Australian Machine Quilting Festival have arranged for Ricky to present a full-day seminar on Friday 28th September.  He's one of my quilting heroes so that's yet another reason for me to go.  The accommodation is already booked!  If you want some more info, follow this link:  ricky-tims-all-day-seminar

See you there!