Recently I've been making a few quilts for the Aussie Hero Quilts project. The first one I made using the stack and slash technique to make star blocks. I took some photos of the method I used, although I did forget to photograph a couple of the steps. Here's what I did in case anyone is interested.
I looked through my stash to find some fabrics that might be suitable for men. I needed 15 blocks for each quilt top so I needed 15 fat quarters, divided into three stacks of five. Some of the fabrics were repeated in two or three of the stacks so that there would be some continuity between the blocks. Working with the first stack of five fabrics, number them 1 to 5, with 1 being on the top and 5 on the bottom. Pin the numbers in the top left corner. Stack them back up on top of each other lining up the edges as best you can. They're not lined up in the photo but that's just so that you can see the numbers.
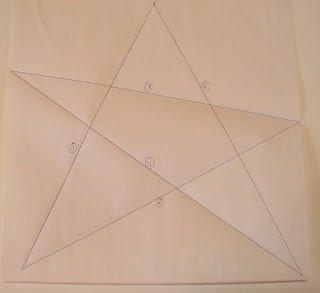
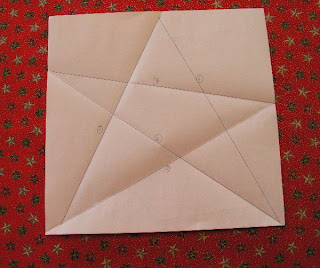
Draw a five pointed star on a 12" square piece of paper. If you click on the photo to enlarge it, you can see that I have numbered the lines from 1 to 5 as that will be the order that the seams are cut and pieced.
Place the star template in the middle of the fabric stack.
Fold the template on the line marked with number 1. Use a long quilter's ruler and a rotary cutter with a sharp blade, cut through the fabric stack about 1/4" away from the fold in the template.
Leave the numbered stack as it is. Take the fabric from the top of the other stack and place it on the bottom of the stack. Take the top piece from each stack and sew them together with a 1/4" seam. Repeat with the next two and so on. Press the seams open! If you press the seams to one side, when you try to make the next cut you'll be trying to cut through 15 layers of fabric!
When the seams are all pressed, stack up the blocks again. Try to line up the seams you've just sewn on top of each other, even if that means that the outside edges don't quite match up. Make sure the fabric with number 1 pinned to it is on the top of the stack and number 5 is on the bottom.
Put the star template back on top, lining up the drawn line number 1 with the seam you just stitched.
Fold the template at line number 2 and cut through the stacked fabrics 1/4" away from the fold.
Here's where I missed taking a few photos. Leave the numbered half of the stack in the same order. Take the top two pieces from the un-numbered stack and place them on the bottom of the stack. Take the top piece from each stack and sew them together with a 1/4" seam. Repeat as before. Again press seams open and restack the blocks with number 1 on top and number 5 on the bottom.
Repeat the process with a third cut and put the top three pieces of the un-numbered stack to the bottom before stitching. The fourth cut is shown below. You've probably already figured out that you'll need to put the top four pieces of the un-numbered stack to the bottom before stitching.
This is the fifth and final cut.At this stage I spread out the five numbered pieces on a table and decided which of the nu-numbered pieces looked best with them, then stitched the final seams.
The blocks look fairly messy at the moment with the edges all uneven.
This is the back of the block showing all the seams pressed open.
The size of the aussie hero quilts is 42" wide by 70"-75" long. If I use 14" blocks and use 3 across and five down, I end up with 42" x 70", so that works out well. I cut my star blocks down to 14 1/2", making sure that the star ended up roughly in the centre of the block. Here they are pinned on my design wall.
There will be more in the next post, including what I did with the trimmings from the edges of the blocks.


5 comments:
I am so delighted that you have written this up for us as a tutorial as I really loved your quilts and I am sure your recipients will too! They are so effective.
Love, Love, LOVE the tutorial, Thanks you so much, I cannot wait to give it a go tomorrow. Great stuff!
I was one of the people off-line for a month and am just browsing some older posts. This is a great quilt - I've not seen it done like this before. And I love the fact that you have given us such a detailed tutorial.
I've made stack & slash before but never a 'star'. I might even have a go...when the weather cools off a bit.
Second attempt. I was one of the people who didn't receive any posts for a month. I'm just doing a bit of browsing of old posts and found your Stack & Slash Star and tutorial.
I love the quilt and the tutorial. Thanks. I may even have a go when the weather cools a little. I have made a couple of stack & slash before but never a star.
Cheers.
Très bonne idée, faisant des recherches sur les patchs " Stack and slash", je vais si vous le voulez bien mettre un lien vers votre blog sur le mien. merci.
Post a Comment