Saturday, 17 November 2012

aussie hero quilts (stack and slash stars part 2)


This is what the star blocks looked like when I'd sewn them together. I was quite pleased with it, but thought it might look better with a bigger variety of fabrics used.

 I wanted to have another try but did it a bit differently the second time. This time I used 30 fat quarters, divided into five stacks with six fat quarters in each. Some of the fabrics appeared in two, three or four different stacks. When I finished the blocks I had 30, which was enough for two quilts. I like these blocks better than the first ones because of the wider variety of fabrics.

Now I had a HUGE pile of trimmings so I cut them so that they had two straight long edges and stitched them all together to make new 'fabric'.


I'd been lucky enough to find some aussie flag fabric at spotlight so I made some wonky blocks with some light tan fabric surrounding a lop-sided rectangle of flags.

I cut some of the fabric made of trimmings and stitched a piece on either side of the wonky blocks. When I pinned them up on the wall, they looked best offset a bit rather than lined up straight.

I found some different blue fabrics in the stash so used that to make the rows 42" wide.

I loaded two quilts onto my machine at the same time, which made the quilting much quicker than if I'd done them separately. They were simply quilted, just a meander with lines about an inch or so apart.

I've tried the same star blocks using greens, blues and greys to make another two quilt tops. I like the way these came out as well. They're not quilted yet but I should be able to get them done soon.

I haven't got as much done in the last couple of months as I had hoped. The chronic fatigue that goes with my MS is really hard to deal with sometimes but I'm trying a new medication to see if that helps. Fingers crossed!

stack and slash stars


Recently I've been making a few quilts for the Aussie Hero Quilts project. The first one I made using the stack and slash technique to make star blocks. I took some photos of the method I used, although I did forget to photograph a couple of the steps. Here's what I did in case anyone is interested.

I looked through my stash to find some fabrics that might be suitable for men. I needed 15 blocks for each quilt top so I needed 15 fat quarters, divided into three stacks of five. Some of the fabrics were repeated in two or three of the stacks so that there would be some continuity between the blocks.  Working with the first stack of five fabrics, number them 1 to 5, with 1 being on the top and 5 on the bottom. Pin the numbers in the top left corner. Stack them back up on top of each other lining up the edges as best you can. They're not lined up in the photo but that's just so that you can see the numbers.

I

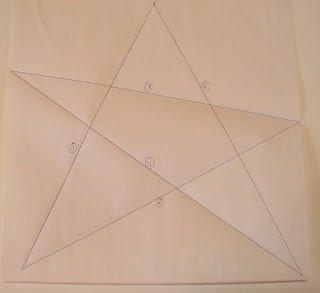
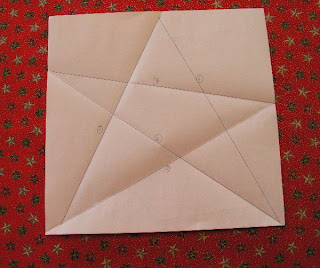
 Draw a five pointed star on a 12" square piece of paper. If you click on the photo to enlarge it, you can see that I have numbered the lines from 1 to 5 as that will be the order that the seams are cut and pieced.


Place the star template in the middle of the fabric stack.

Fold the template on the line marked with number 1. Use a long quilter's ruler and a rotary cutter with a sharp blade, cut through the fabric stack about 1/4" away from the fold in the template.


Leave the numbered stack as it is. Take the fabric from the top of the other stack and place it on the bottom of the stack. Take the top piece from each stack and sew them together with a 1/4" seam. Repeat with the next two and so on. Press the seams open! If you press the seams to one side, when you try to make the next cut you'll be trying to cut through 15 layers of fabric!

When the seams are all pressed, stack up the blocks again. Try to line up the seams you've just sewn on top of each other, even if that means that the outside edges don't quite match up. Make sure the fabric with number 1 pinned to it is on the top of the stack and number 5 is on the bottom.

 Put the star template back on top, lining up the drawn line number 1 with the seam you just stitched.
Fold the template at line number 2 and cut through the stacked fabrics 1/4" away from the fold.


Here's where I missed taking a few photos. Leave the numbered half of the stack in the same order. Take the top two pieces from the un-numbered stack and place them on the bottom of the stack. Take the top piece from each stack and sew them together with a 1/4" seam. Repeat as before. Again press seams open and restack the blocks with number 1 on top and number 5 on the bottom.

Repeat the process with a third cut and put the top three pieces of the un-numbered stack to the bottom before stitching. The fourth cut is shown below. You've probably already figured out that you'll need to put the top four pieces of the un-numbered stack to the bottom before stitching.

This is the fifth and final cut.At this stage I spread out the five numbered pieces on a table and decided which of the nu-numbered pieces looked best with them, then stitched the final seams.

The blocks look fairly messy at the moment with the edges all uneven.

This is the back of the block showing all the seams pressed open.

The size of the aussie hero quilts is 42" wide by 70"-75" long. If I use 14" blocks and use 3 across and five down, I end up with 42" x 70", so that works out well. I cut my star blocks down to 14 1/2", making sure that the star ended up roughly in the centre of the block. Here they are pinned on my design wall.

There will be more in the next post, including what I did with the trimmings from the edges of the blocks.

Sunday, 5 August 2012

Baking Day

I just felt like baking some biscuits (or cookies as some of you might call them) this morning. A few new recipes and they all turned out very well so I thought I'd share the recipes here. All of them are really simple - sorry I forgot to take photos!


Custard Buttons 
125g butter, room temperature
1 cup plain flour
1/3 cup icing sugar
¼ cup custard powder
grated orange rind
icing: 1 cup icing sugar
½ tsp grated orange rind
2 tbspn orange juice

Combine buttter, flour, icing sugar and custard powder in bowl of food processor, process until mixture clings together when pressed with fingers. Roll mixture into small balls, place on lined trays, flatten slightly with fork. Bake at 170degC for about 20 minutes or until golden brown. Remove from trays, cool on wire racks. Dip tops of biscuits into icing, then sprinkle with grated orange rind.
Icing: Combine sifted icing sugar, grated orange rind and juice, beat until smooth.


Almond and Ginger Biscuits 
1 ½ cups plain flour
½ tsp carb soda
1 tsp cinnamon
3 tsp ground ginger
1 cup castor sugar
½ cup ground almonds
125g butter
1 egg
2 tsp golden syrup
¾ cup blanched almonds

Sift dry ingredients, stir in sugar and ground almonds. Rub in butter, add combined egg and golden syrup. Knead dough on lightly floured surface until smooth. Roll level teaspoonfuls of mixture into balls, place about 5cm apart on greased trays. Press a blanched almond on each biscuit to flatten slightly. Bake at 160degC about 15 minutes or until firm. Cool on racks. Makes about 50.


Almond Cinnamon Biscuits
1 ¾ cups sr flour
1 cup brown sugar
¾ cup ground almonds
125g butter melted
½ tsp vanilla
1 egg
1 tbspn castor sugar plus 2 tsp cinnamon, combined

Sift flour, stir in brown sugar and almonds. Blend in butter, egg and vanilla. Spoon teaspoonsful of mix onto lined trays. Flatten slightly and sprinkle with combined sugar and cinnamon. Bake at 180degC for 10 to 15 minutes. Alternatively, roll into small balls and press top with fork before sprinkling with cinnamon sugar.


Chocolate Fork Biscuits 
125g butter
¼ cup castor sugar
1 cup sr flour
Pinch salt
2 ½ tbspn cocoa

Cream butter and sugar until white and fluffy. Stir in sifted dry ingredients. Roll into balls the size of a walnut and place on greased baking trays. Flatten each ball with a fork dipped in water. Bake at 190degC for 10 to 12 minutes. We like them with just a few drops of peppermint essence added too.

Monday, 21 May 2012

Blogger's Quilt Festival

I've decided to take part in the Blogger's Quilt Festival this year.  I've looked at all the gorgeous quilts in previous years but not posted one of my own.  Thanks, Amy, for arranging this event for the seventh time!


Amy's Creative Side


The quilt I'm showing is one I've just recently finished.  It's called Summer Serenade. It was the final assessment piece for the City & Guilds Level 2 Patchwork & Quilting Certificate course I've been doing through Design Matters (Linda and Laura Kemshall). Edwina Mackinnon is the wonderful tutor I had for the course.

Each step in the making of this quilt had to be explained and sampled, so I ended up with heaps of photos.  The seven posts previous to this one show the making of the quilt step-by-step if anyone is curious.  Anyway, here's some photos.  I had trouble getting a photo of the whole quilt that showed the colours properly.  The colour in the closeup photos is much closer to real life.  I put a pale fabric on the back so the quilting would show up.  The quilting was done on my trusty little Husqvarna Lily.  She's 13 years old and still going strong.


I hope you liked the photos.  Please consider leaving a comment as I would love to hear from you!

Thursday, 3 May 2012

summer serenade part 7 - the finished quilt!

If you've read this far, thank you.  Please consider leaving a comment...

I took photos of the quilt in my studio, in various places and at various times, but had great trouble getting one that showed the true colours or the quilting design.  In the end Murray and I took it outside and tried there.  This is the best of a bad lot.  The closeup photos are much better though, so I hope you enjoy looking at them.


I sent the photos away to my tutor, who replied that she loved the quilt and that the quilting was 'exquisite'!  Needless to say, I was more than a little pleased at her response.  I received my certificate from City & Guilds in the mail yesterday!  Yes!!


summer serenade part 6


I like to use a wool/poly blend batting for quilting.  I like the loft it gives and the fact that it has a bit of body to it.  I pin basted the layers of the quilt together using the same cream fabric on the back as I used on the front.  I was a bit hesitant because it would show every wobble in the quilting stitches but then I thought "just go for it".

The first quilting I did was four long wavy lines in red thread just on the edge of the coloured areas where they border the cream section.  I didn't do the pebbles until later though.  I didn't mark the lines on the fabric.  I made up a freezer paper template.  I didn't want to tear off a piece of freezer paper that long, so cut off a 16" piece then cut that into 4 strips, overlapped the ends and dabbed them with the iron to stick them together.

Next was the flowers.  This is the flower motif I quilted in the coloured areas of the quilt.  I cut the circles for the flower centres out of freezer paper and ironed them to the quilt top.  I quilted around them then removed them before finishing the flower petals.


I enlarged the outline of the flower motif to quilt behind the quiltlets, the same as I did in the play piece.  I drew the outline on greaseproof paper with water-soluble pen then pinned the paper to the quilt top and quilted through the paper.  It's easy to tear off the paper although I had to just scratch over the top of a few little bits that got caught under the stitches.  To mark the cross hatching design I used painters tape.  It's really low-tack tape and doesn't leave any residue.  It can be used several times before it runs out of 'stickability'.


I drew out several different ideas for the background of the cream section then quilted them out on a scrap quilt sandwich, using dark thread just so I could see it a little easier.


While I would have liked to do the mctavishing, it was going to be just too difficult to see.  It might be easier to do mini mctavishing on the longarm machine but I haven't tried it yet.  I did some little swirly quilting and decided to add a few areas of straight lines to add a bit of interest.  The two photos below are before and after adding microstippling to make the checkerboard design in the flower outline.


I decided to do some quilting on the purple quiltlets as they bagged out a bit without it.  I used a single strand of embroidery thread to quilt around the main elements in the flowers and echo quilting in the background.

Next post - the final product!

summer serenade part 5

I had to show samples of the quilting before I started doing any on the actual quilt, so this is my 'play' piece.  I was thinking about doing some of the quilting in gold thread.  I used Raiman rayon thread which quilts up very well on my Husqvarna, with a bottomline pre-filled bobbin.  The cream quilting in the background uses the same bobbin with Signature thread in the top.  The micro stippling was SO time consuming that I didn't do any that would be behind the purple quiltlet.


I placed it against the sample of the coloured fabrics.  I thought that it didn't really need the gold thread as I wanted the quilting to be more of a background than a feature, so I decided to do the quilting on the actual quilt with cream thread instead of the gold.


I tried out some ideas for the cream background next - micro stippling and mctavishing (the swirly design).  I LOVE the look of the mctavishing but it was very hard to see the cream thread on the cream fabric.  I finished it on this little piece though.


There were some leftover coloured strips of fabric left over from where the main quilt so I stitched a couple of borders around the 'play' piece and made it into this little quilt.  I really like the way it turned out in spite of the fact that I had to add the borders quilt-as-you-go style, because the backing fabric was cut the same size as the cream bit on the front.  It was a bit of a pain to do but turned out okay if you don't look at the back very closely!