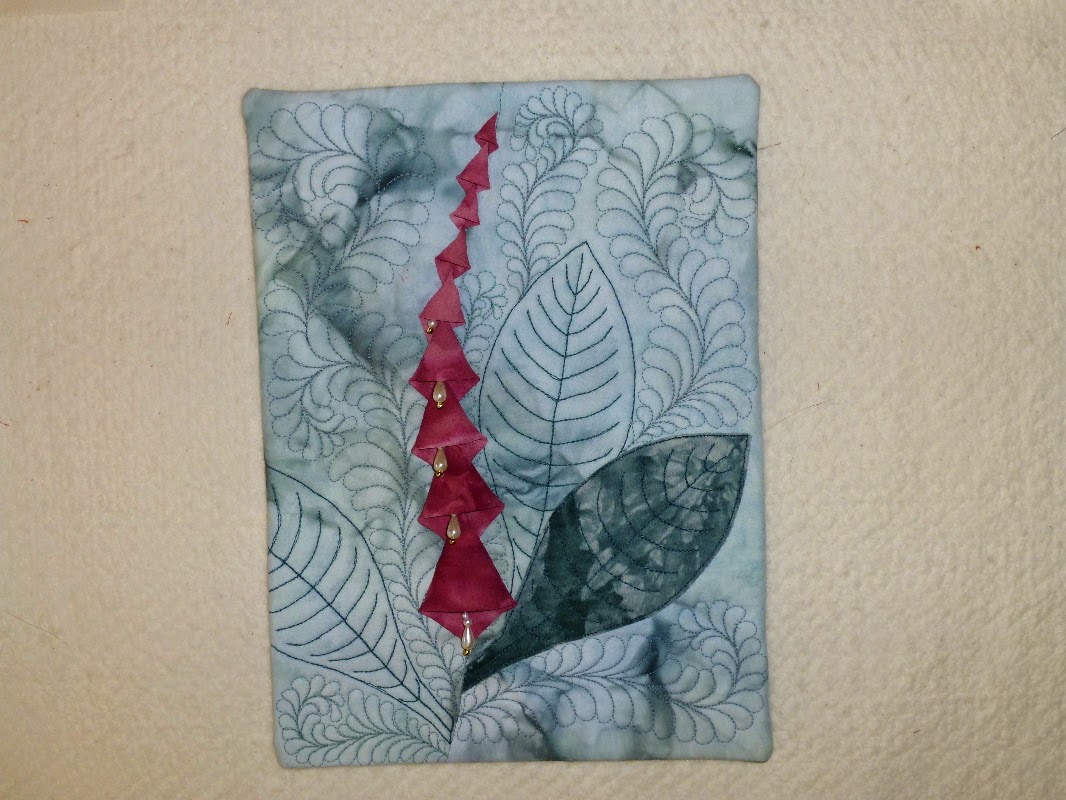
I made 'Foxglove' as my entry in a quilt challenge my quilt group had recently. I actually remembered to take step-by-step photos as I went. The background is one of my hand painted cottons, and the flower is a chiffon (I think) that looks like it's been tie-dyed. The theme for the challenge was Pearl (to celebrate our group's 30th birthday this year). I decided on the flower design and stitched in the pearls after everything else was done. The piecing and free motion quilting was done on my little Husqvarna Lily. I L-O-V-E my Lily!
Showing posts with label quilting. Show all posts
Friday, 28 November 2014
Monday, 31 March 2014
Next step?
This is what is up on my design wall at the moment. I don't really have a plan for the next step. All the little circles are fused on but the big circle is just pinned at the moment. I thought of doing some kind of freehand feathery quilting in hot pink thread, or quilting more rows of circles, or maybe both. Any suggestions?
Friday, 6 December 2013
I'm a cover girl...
...or at least my quilt is. Another photo I forgot to post. My quilt Psychedelic Peonies was chosen to be on the cover of Australian Patchwork & Quilting machine quilting issued in July. What a thrill! I doubt it will ever happen again so...
...here it is!!
...here it is!!
Thursday, 21 November 2013
Fuchsia Fantasy 3
I felt like doing some quilting on my little Husqvarna so decided to finish up this little quilt top that I made a few years ago. The flower was inspired by a class with Jane Sassaman, where we had to choose a photo of a flower, do a pencil sketch, erase most of the detail and exaggerate what was left. I really like the fat little fuchsia flower that I ended up with!
When I quilt on my domestic machine, I like to use squares of non-slip drawer liner instead of quilting gloves. I find the gloves make my hands too hot, and I'm forever taking them off and putting them back when I want to thread needles, grab a mouthful of my cup of tea or whatever. I also put a square of it under my foot pedal to stop it sliding on the tile floor.
Tuesday, 2 July 2013
connections
I used quite a few different techniques - machine piecing, machine quilting, hand applique, hand embroidery, beading. All the parts that make up the wall hanging are different sizes and shapes. I entered it in the Tasmanian Quilt Guild's annual show and was thrill ed when it won two prizes - overall Best Use of Embellishment and also Highly Commended in the Art Professional category.
Friday, 28 June 2013
trees
I don't think I ever posted photos of this quilt from a few years ago. It's my own design that originated from a challenge between my friend Judi and I. We each used a photo and traced some of the lines from the photo onto tracing paper, then simplified the lines even further by erasing some of them. We then cut a 1" square hole in a larger piece of cardboard and moved the cardboard over the drawing until we found a section that seems to have interesting design possibilities. The drawing takes on a completely different look when you can only see a 1" square section at a time. We had to expand the design from the little section we'd chosen, without referring back to the original photo. It was a very interesting exercise. This quilt was the result. I did the quilting on my Husky rather than the longarm, as I didn't think I'd be able to do all the echo quilting as well as I would like on the longarm. I wrote up the pattern for it last year and it was published in Australian Patchwork and Quilting magazine.
Sunday, 23 June 2013
Flower practice quilt
I made this little quilt as a practice for a larger quilt I want to make. I tried out a few new things on this quilt - I did all the applique and quilting on my longarm quilting machine. The tiny little circles around the flowers and the mock buttonhole kind of stitch on the leaves took f-o-r-e-v-e-r to do but I'm quite pleased with the way they came out.
I wanted to try McTavishing on this one, and also try to scale down a meandering feather as a background filler. I decided to put the diamond shape in just as a bit of added interest.
So this is the finished quilt. Don't know why I haven't taken a photo of it with the binding finished yet. What do you think?
Thursday, 3 May 2012
summer serenade part 7 - the finished quilt!
If you've read this far, thank you. Please consider leaving a comment...
I took photos of the quilt in my studio, in various places and at various times, but had great trouble getting one that showed the true colours or the quilting design. In the end Murray and I took it outside and tried there. This is the best of a bad lot. The closeup photos are much better though, so I hope you enjoy looking at them.
I sent the photos away to my tutor, who replied that she loved the quilt and that the quilting was 'exquisite'! Needless to say, I was more than a little pleased at her response. I received my certificate from City & Guilds in the mail yesterday! Yes!!
Labels:
city and guilds,
finished,
quilting,
summer serenade
summer serenade part 6
I like to use a wool/poly blend batting for quilting. I like the loft it gives and the fact that it has a bit of body to it. I pin basted the layers of the quilt together using the same cream fabric on the back as I used on the front. I was a bit hesitant because it would show every wobble in the quilting stitches but then I thought "just go for it".
The first quilting I did was four long wavy lines in red thread just on the edge of the coloured areas where they border the cream section. I didn't do the pebbles until later though. I didn't mark the lines on the fabric. I made up a freezer paper template. I didn't want to tear off a piece of freezer paper that long, so cut off a 16" piece then cut that into 4 strips, overlapped the ends and dabbed them with the iron to stick them together.
Next was the flowers. This is the flower motif I quilted in the coloured areas of the quilt. I cut the circles for the flower centres out of freezer paper and ironed them to the quilt top. I quilted around them then removed them before finishing the flower petals.
I enlarged the outline of the flower motif to quilt behind the quiltlets, the same as I did in the play piece. I drew the outline on greaseproof paper with water-soluble pen then pinned the paper to the quilt top and quilted through the paper. It's easy to tear off the paper although I had to just scratch over the top of a few little bits that got caught under the stitches. To mark the cross hatching design I used painters tape. It's really low-tack tape and doesn't leave any residue. It can be used several times before it runs out of 'stickability'.
I drew out several different ideas for the background of the cream section then quilted them out on a scrap quilt sandwich, using dark thread just so I could see it a little easier.
While I would have liked to do the mctavishing, it was going to be just too difficult to see. It might be easier to do mini mctavishing on the longarm machine but I haven't tried it yet. I did some little swirly quilting and decided to add a few areas of straight lines to add a bit of interest. The two photos below are before and after adding microstippling to make the checkerboard design in the flower outline.
I decided to do some quilting on the purple quiltlets as they bagged out a bit without it. I used a single strand of embroidery thread to quilt around the main elements in the flowers and echo quilting in the background.
Next post - the final product!
Labels:
city and guilds,
quilting,
quilting designs,
summer serenade
Subscribe to:
Posts (Atom)